DIY: DELICATE GARLAND
| Happy Friday Guys….I am SO excited to have as our special guests today, Emily from Once Wed and Laurie of la la laurie…I adore Emily…her blog site is one of my favorites….I enjoy her daily dose of inspiration and I’m so happy to have her stop by the cafe. One of my favorite features that Emily shares with us are the DIY projects…always fun and always ‘user friendly’…Laurie is the ‘queen of the crafts’ and she came up with a special TBC DIY project…Delicate Garland…it’s a fun and easy project and the end results are simply gorgeous…..Enjoy!! |
![]()
 |
![]()
 |
![]()
 |
![]()
 |
![]()
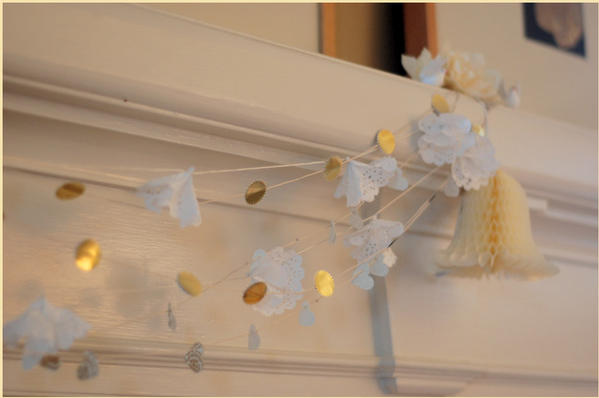
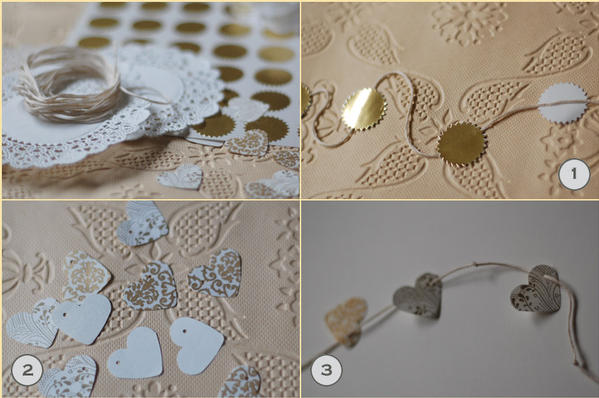
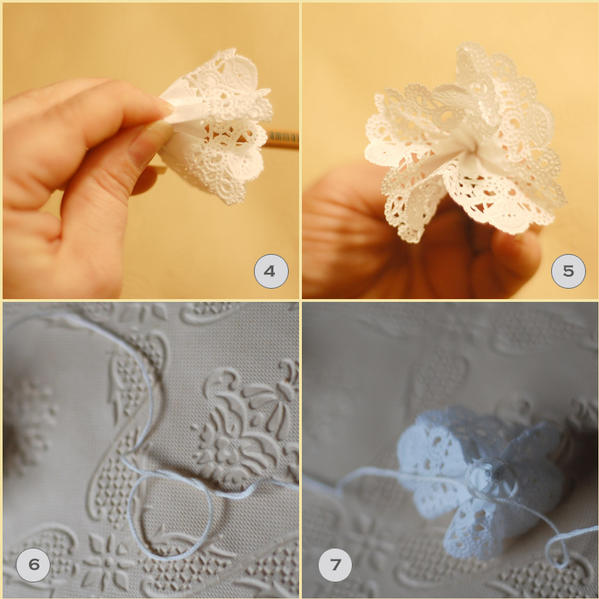
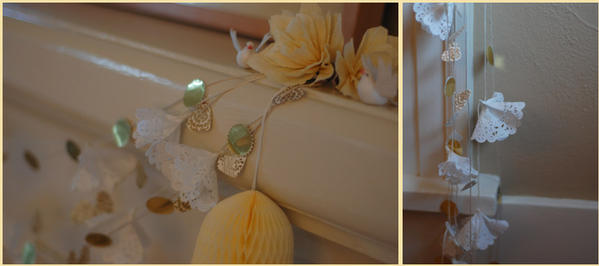
| What You’ll Need: Paper Doilies (4′ – 5′) Embroidery floss (you can also use plain, old string, bakers twine or waxed string) Decorative paper Gold foil seals ( 1/2′ diameter) Pencil Resources: Doilies, floss, and paper are available at most craft stores. Gold seals can be found at office supply stores. Instructions: Gold Seal Strand: 1.Cut a piece of embroidery floss to the desired length and tie a knot at each end. 2. Start at one end of the floss, and stick two of the foil seals back to back with the floss running between. Repeat every three or four inches until you reach the end. (see figure 1) Heart Strand: 2. Cut a piece of embroidery floss to the desired length and tie a knot on one end. 3. Take one of your paper hearts and thread the floss through the punched hole. Slide the heart to the knot at the end. (see figure 3) 4. Tie another knot three inches down the line, slide another heart down the floss until you reach the knot. Repeat the knots and hearts until you reach the end of the floss and knot once more. Doily Flower Strand: 2. Remove the doily from the end of the pencil, keeping it pinched between your fingers. Fold the petals outward. (see figure 5) 3. Repeat steps one and two and create enough flowers for your garland. (I made 12 flowers for a six foot garland). 5. Cut a piece of embroidery floss to the desired length and tie a knot on each end. 6. About 4 inches from one end of your floss, tie a loose knot, leaving an opening about 1/2′ wide. (see figure 6) 7. Slip the open knot over the point of one of your flowers, then pull the knot tightly closed. Tie a second knot to secure the flower. (see figure 7) 8. Continue down the floss, attaching a flower every five inches until you reach the end. Joining the Strands: The strands can easily get tangled, so it’s best to wait to join them until you’re ready to hang them. I suggest until then, keep them wrapped around a paper towel tube or cardboard scrap. To join them, just gather one (or two) of each strand and knot this grouping at both ends. You can use these garlands to trim a table, mantle, window, or any architectural element. What it cost: Thanks SO much Emily for stopping by the cafe today and a HUGE thank you to Laurie for another awesome DIY project! |
![]()