DIY – FABULOUS FALL TEXTURES
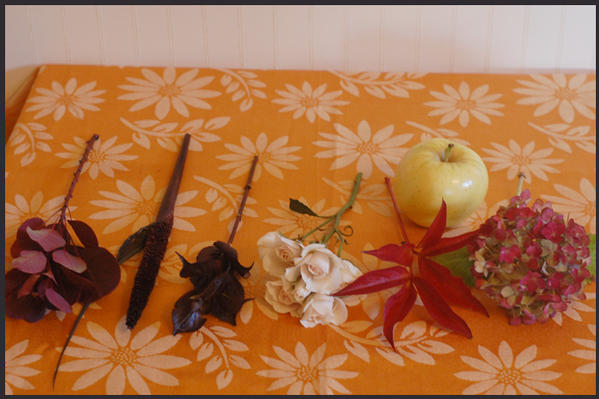
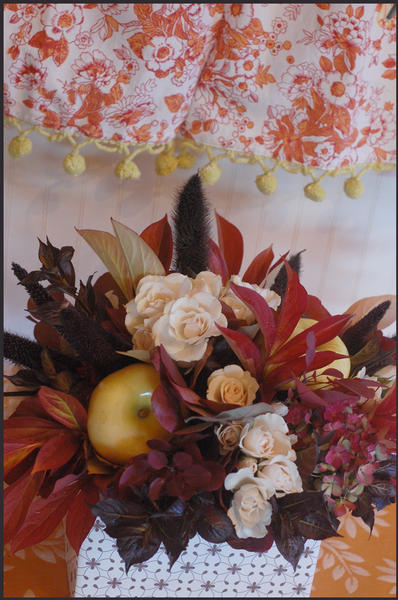
| Autumn offers an amazing abundance of color and texture. Not just in flowers, but in foliages, seed pods, fruits and berries. By using lots of these seasonal offerings, you can create a very lush and colorful centerpiece without using a lot of flowers. Using less flowers, generally means you’ll spend less money. Some of the products I used for the arrangement was purchased at my local flower market. I also was able to harvest many foliages from my own yard. Look around your yard and neighborhood. Mother Nature has a lot to offer this time of year! |
![]()
 |
![]()
| What You Need: 15 stems of assorted fall foliages such as: Smoke Bush, Weigela, and Peony foliage 5 stems (roughly) of textural elements such as: Hydrangea, berries, seed pods 5 stems of a focal flower such as: Roses or any other larger, round flower. 10 stems of a linear element such as: Purple Millet, Broom Corn or Cattails 3 apples ( Aurora Golden Galas) |
![]()
 |
![]()
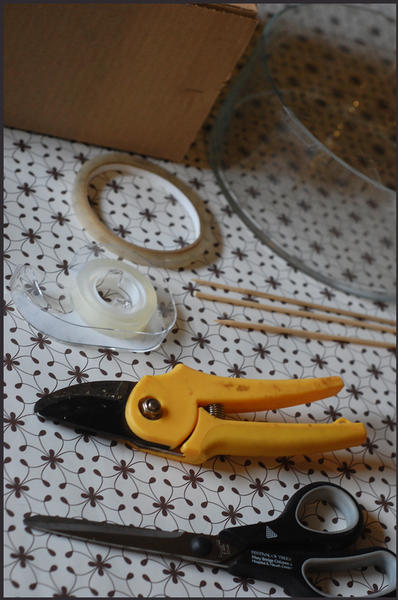
| A shallow cylinder vase 7′ in diameter Clear floral tape A cardboard box with an open top (slightly larger than your vase) (an 8 x 8 floral delivery box works perfectly) A large sheet of decorative paper (you could also use wall paper) 1/4 inch clear floral tape Double sided tape Floralife or similar fresh flower food Bamboo skewers Scissors Floral clippers Before You Get Started: |
![]()
 |
![]()
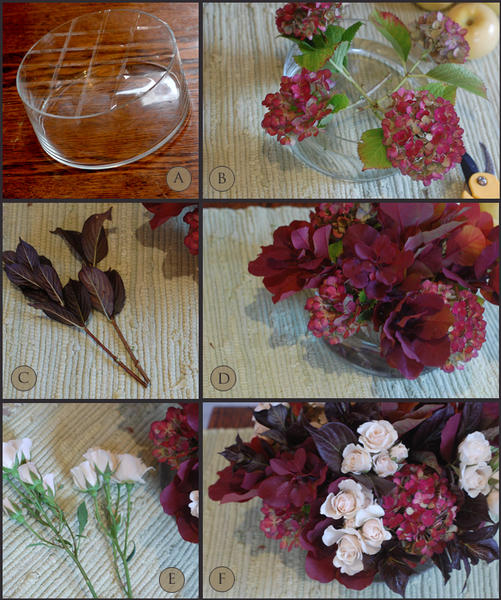
| Part One: Arranging the flowers. 1. Use your 1/4′ clear floral tape to tape a grid across the top of the vase. The tape lines of the grid should be about 1.5 inches apart and the tape should be pulled tight. Tape around the exterior of the vase, right along the top edge, to secure your grid. This grid will offer support and make arranging in a shallow vase with a large opening much, much easier. (see image A) 2. Add the appropriate amount of flower food to your vase, then fill your vase with water. 4. Add your larger leafed foliages, Smoke Bush and Weigela, next. Like the hydrangeas, you’ll be stripping the lower leaves. You don’t want any foliage beneath the water line. Leaves in the water, turn the water murky and reduce the life of your arrangement. Evenly distribute the foliages until the vase is nearly full, and the tape grid disappears. (see images C an D) 5. Clean the lower foliage from your roses and remove any bruised outer ‘guard’ petals and add the roses to the arrangement. (see image E and F) |
![]()
 |
![]()
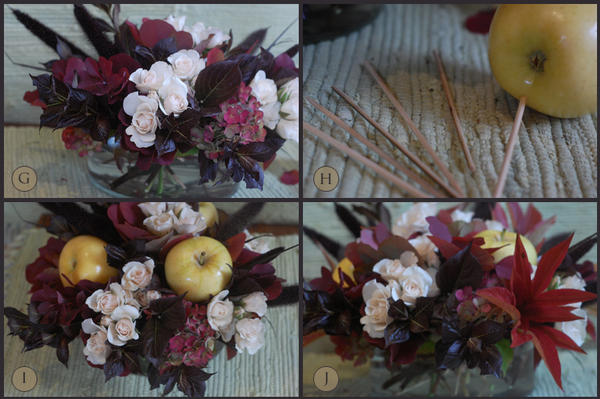
| 6. Next, add the linear element, the Purple Millet. You’ll want to cut these stems slightly longer than the other leave and flowers so they break out of the roundness of the arrangement. (see image G)
7. Cut your bamboo skewers so they’re roughly 6′ long. Stick a skewer into the bottom of each apple and add the apples to the arrangement. (see images H and I)
8. Lastly, add your peony foliage. Like the millet, keep the stems a little longer to add more depth and dimension to the arrangement. This will help it look more loose and natural. (see image J)
|
![]()
 |
![]()
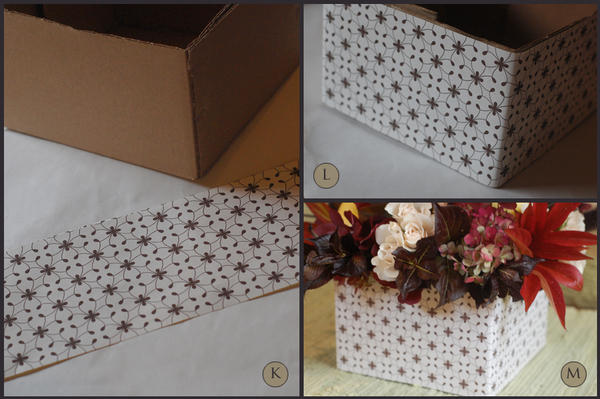
| Part two : The Box 9. Cut a band of paper the same height as the box, and wrap it around the box perimeter. (see image K) 10. Use your double stick tape to attach the paper to the box. (see image L) 11. Drop your vase arrangement carefully into the box and enjoy! (see image M) |
![]()
 |
![]()
 |
![]()
| Project Notes: 1. It’s best not to transport your arrangements to the wedding in these boxes. Pack them separately, and add the flowers to the boxes when you are ready to place them on the tables. 2. Mix it up! Try different papers and different flowers. Your centerpieces don’t have to all be identical. 3. Brides, don’t take on your flowers by yourself. Flowers, of course, are perishable so arrangements have to be made the day of, or day or two before your wedding. Farm this task out to your crafty friends! You can do all the decision making, flower order and shopping, but delegate out the actual flower arranging. |
![]()
|
Laurie, thanks SO much for sharing this beautiful DIY with us…and how perfect for the season!! |
![]()