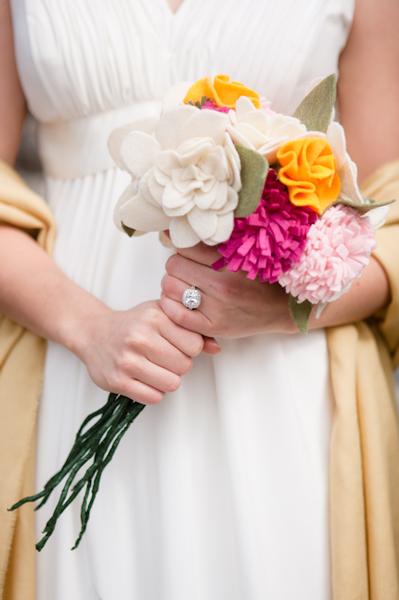
| Hi Guys….remember this beautiful DIY Inspired Shoot by Claire of Claire Marika Photography…….well, we are in for a treat today….Claire made the pretty felt bouquet and bout for the shoot and she’s here today to share all the ‘how to’s’ with us…so get ready to have some fun and be inspired…take it away Claire…xoxo |

For the Bouquet……You will need:
- felt squares in various colors, including green for leaves
- floral wire in stem form (pre-cut lengths)
- green floral tape
- needle and thread
- sharp scissors
- pencil
(the link below has the template you will need for the project)
|
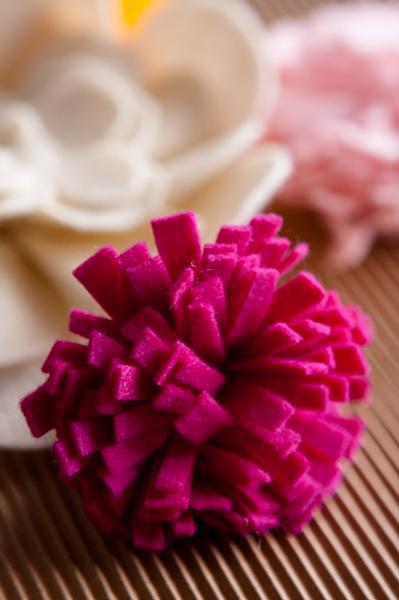
- For the mums:
- Cut a strip of felt that is 12 inches long and 1.5 to 2 inches wide (see template 1). You can vary these dimensions to make smaller or larger flowers.
- With your strip laid horizontally in front of you, make little cuts in your felt every quarter inch, stopping about a half inch from the bottom to create a tassel-like fringe.
- Cut a second strip and repeat the same steps. This second strip can be the same color as your first, or a slightly different shade if you want a two-tone flower.
- Stack your two strips one on top of the other, and roll them up.
- Sew through the uncut bottom end to prevent your flower from unravelling.
|
 |
- For the ranunculus:
- Use a compass, or a cup, bowl, or other household object to trace a circle in your felt. Ideally, this circle should be about 3 or 4 inches in diameter, but again, you can vary the size to make smaller or larger flowers
- Cut out the circle and fold it in half, then in half again, and in half once more.
- Sew through the bottom of the flower, about a half inch from the tip, making sure to catch every layer of your folds.
- Once the bottom is secured, you can re-adjust the top of the flower so that it settles into ruffles.
|
 |
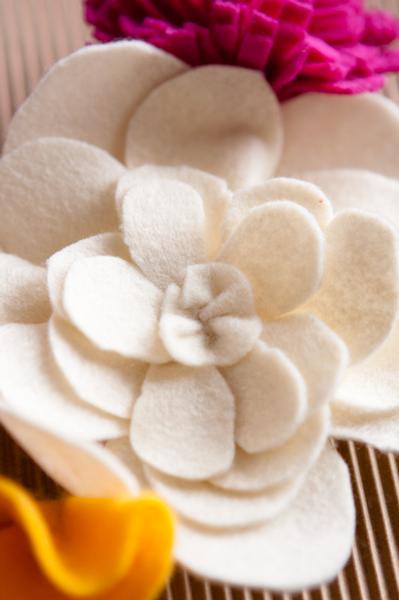
- For the gardenias:
- Trace templates 2-6 onto your felt and cut them out. Once again, make your own variations to change flower size.
- Starting with your largest strip of petals, begin scrunching the bottom part in on itself and sewing as you go so that it forms into a circle.
- Repeat this with each strip, and then stack your petal circles one on top of the other with the largest on the bottom.
- Rotate and arrange them so that they look good, and sew them together to form your flower.
|
 |
- Then, assemble the bouquet:
- Once you’ve made all the flowers you want in your bouquet, you’ll need to put them on stems.
- To do this, bend the end of a piece of floral wire into a circle by wrapping it around your finger. Make sure to close the circle by twisting it in on itself once or twice.
- Sew the bottom of the flower securely to the wire circle.
- Take a second piece of floral wire and twist it together with the wire that has the flower attached to it. This will make your stem thicker and stronger.
- Next, cover the entire stem with floral tape by winding the tape around the wire, working your way down from the flower and overlapping the tape on itself each time.
- Repeat this for each flower
- Arrange your flowers into a bouquet, and once you’re happy with the way it looks, wrap some floral tape around your stems to bind them together.
- Cut some leaves out of your green felt square (you can use template 8), and add them to your bouquet wherever you think they look good. Do this by sewing them to the bottoms of flowers.
- You can finish your bouquet by tying a ribbon around the stems.
|
 |
For the Bout…….You will need:
- medium gauge yarn
- one square of green felt
- floral wire in stem form (pre-cut lengths)
- green floral tape
- boutonniere pin
- sharp scissors
- pencil
|
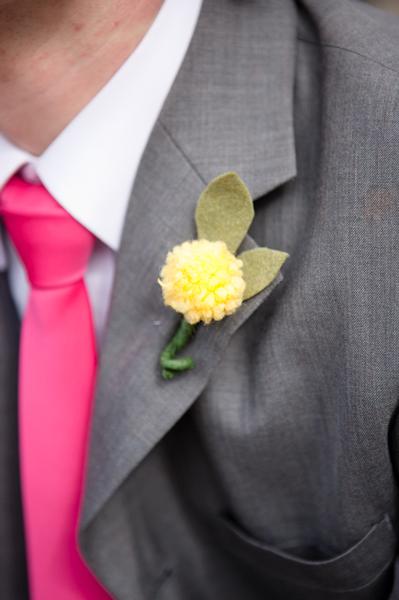 |
Instructions:
- Make the pom pom
- Cut two pattern pieces from template 7 into cardboard or heavy card stock. It’s alright if the circles are a little jagged, it won’t affect your results. Your finished pieces should resemble a donut or ring.
- Sandwich the two pieces together
- Cut a piece of yarn about the length of your arm, and a second piece about 10 inches long.
- Hold one end of the long piece of yarn against your cardboard ring, pinching it between your thumb and index finger to keep it in place, and begin looping your yarn through the central hole and around the outside of the ring. Don’t do it so tightly that you’re putting a lot of strain on the cardboard, but don’t leave slack in your yarn either.
- You’ll be covering both of the pattern pieces that you sandwiched together, and leaving the hole in the middle open.
- Continue passing the yarn through the hole and looping around your pattern piece. In the end, the donut should be completely covered in yarn. You may need to add new pieces of yarn if you run out. Just be sure that you’ve passed over the end of your first piece of yarn so that it won’t begin unravelling, and that your ends are on the outside, never in the middle.
- Once you can no longer see any cardboard, cut your working yarn flush to the edge of the pattern piece.
- Maintaining your grip on your loose end of yarn, find a gap through which you can see the edges of your two pieces of cardboard.
- Insert your scissors into the gap in between the two pieces of cardboard, and start snipping the yarn. Put your thumb over the hole in the middle to prevent the short bits of yarn from falling out.
- Once you’ve worked your way around the circle, take your 10 inch length of yarn and wrap it around the center of your pom pom, passing in between the two pieces of cardboard. Wrap twice around the center, and then tie it off into a tight knot.
- You can now remove the pattern pieces and fluff your pom pom, trimming any uneven pieces of yarn.
- Make the leaves by tracing template 8 onto your green felt (or trace your own design if you have a different shape in mind) and cut it out, making sure to leave a bit of a tail for attaching it to the boutonniere.
- Wind some floral wire around the pom pom tightly and securely so that the wire is not visible.
- This will leave you with an excessively long stem. You’ll want to wind the wire or the stem around itself once or twice so that you end up with a stem that is one or two inches long and pretty thick.
- Now cover your stem with floral tape by winding the tape around the wire, working your way up from the bottom and overlapping the tape each time.
- Once the stem is completely covered, sew the leaf or leaves to the tape
- Cover the bottom part of the leaf with more floral tape, and voila! Put a pin in it and it’s ready to go.
|
 |
| Isn’t this just the cutest bouquet and bout….I LOVE IT….thanks Claire for stopping by and sharing all the fun with us….guys, make certain you check out Claire’s site and have fun with this cute DIY….xoxoxo |
|
|
|
|