DIY: WINTER WEDDING WREATH
| Laurie Cinotto of La La Laurie shares all the info on making the beautiful Winter Wedding Wreath…have fun everyone!!
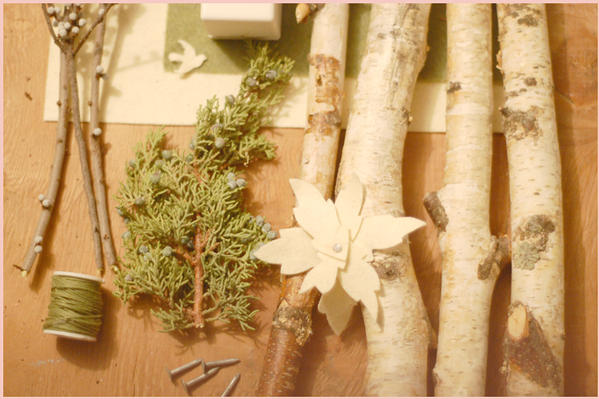
Materials: Four birch branches of equal length (approximately 15 inches long) Fabric coated wire A few Bay Berry (or other type of berry) branches Several sprigs of Juniper One sheet of ivory or white felt Five nails Hot glue gun and glue sticks Hammer Floral clippers Fine point marker |
![]()
 |
![]()
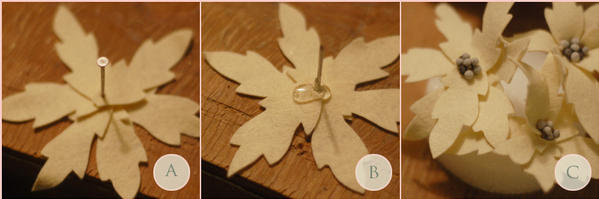
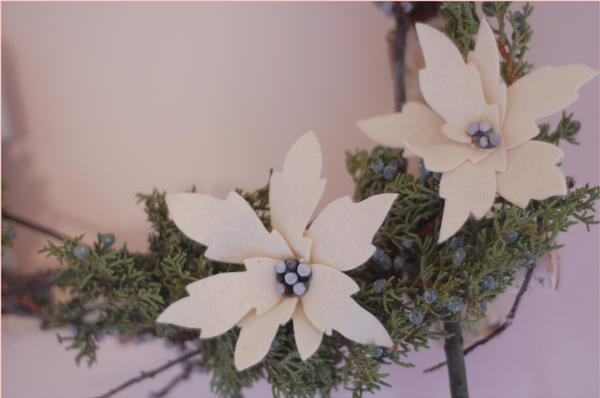
| Instructions for the Felt Poinsettias:
1. Download your Poinsettia Petal Template by clicking here. 2. Print the template out on a heavy card stock. Carefully cut it out with your scissors. 3. Trace around your petal template using your marker on the felt. Trace 5 – 6 petals for each flower. 4. Arrange 5 – 6 petals into a flower shape, with the bottom points of each petal overlapping. (see image A) 5. Take your hammer, and drive the nail in the center of your flower, through your overlapped petal points. ( If you like, use a scrap of wood under your flower to protect your work surface while hammering) Slide the petals up the nail, so they rest just under the nail head. 6 . Flip the flower over and put a glob of hot glue on the back of the bloom to keep it from sliding down the nail. (see image B)7 . Flip the flower over again, and carefully squirt a large dot of glue in the center of the bloom. Take a few berries, and drop them into the glue to create your flower center. (see image C) |
![]()
 |
![]()
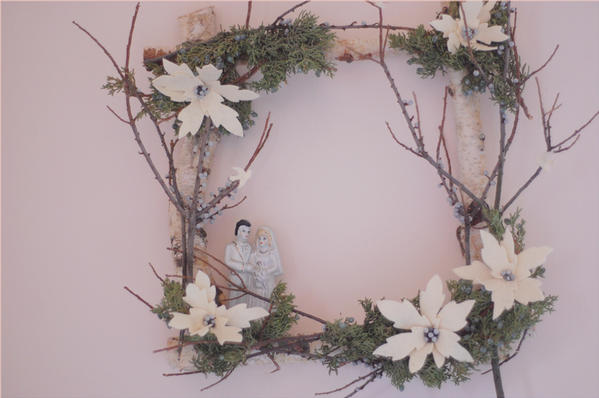
| Instructions for the Wreath Frame:
1. Form your four birch branches into a square with the ends overlapping. (see image D) 2. Bind each of your corners tightly, using your wire. If your corners are a little wiggly, reinforce them by carefully squirting a little hot glue where the branches overlap. (see image E) 3. Cut several berry branches approximately 17 inches long (slightly longer than your birch segments) 4. Lay the branches around your birch frame, and carefully attach them with your glue gun. (see image F) |
![]()
 |
![]()
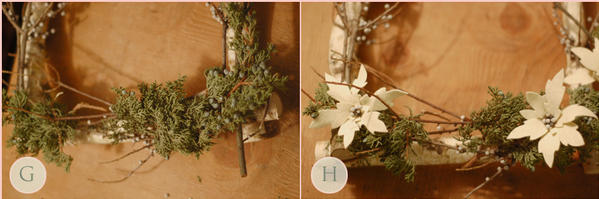
| 5. Snip several bits of Juniper, and tuck them into the branches. Concentrate the Juniper in the corners of the frame, and leave some of the bare branches showing. Secure the Juniper with a little hot glue. (see image G)
6. Attach your felt flowers to the wreath using hot glue. (see image H) |
![]()
 |
![]()
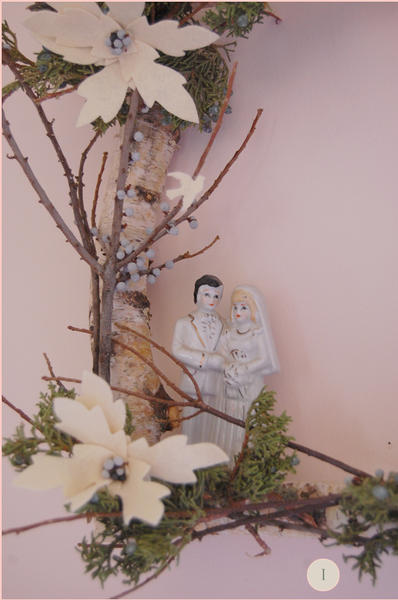
| 7. Personalize your wreath! I glued a vintage wedding cake topper and a few tiny felt bird to mine. Glue or wire in a few ornaments, miniature framed photos, or anything you like to make it your own! (see image I) |
![]()
 |
![]()
 |
![]()
 |
![]()
 |
![]()
| Thanks Laurie for another great DIY….we look forward to your next visit….guys, make certain you stop by Laurie’s site to see more of her fun and beautiful DIY projects! |
![]()